BGP Route Aggregation
In the Advertise IPv4 Prefixes to BGP Neighbors, you configured a router to advertise the IP prefix assigned to your site unconditionally. That’s good enough for small, non-redundant networks; in more complex scenarios, you’d want a WAN edge router to advertise a prefix only if it can reach at least some parts of that address space.
For example, in this lab exercise, you’ll configure the WAN edge router on Site-1 (R1) to advertise IP prefix 10.42.42.0/24 only if it has at least one more specific prefix in the IP routing table.
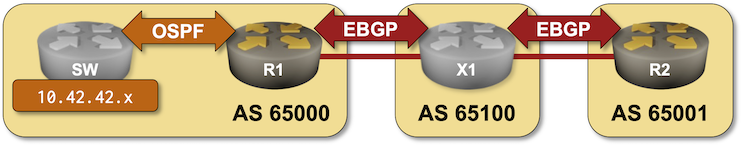
You could achieve that goal in various ways; we’ll use the most straightforward approach – route aggregation (called summarization in other routing protocols). You’ll configure BGP route aggregation on R1 and observe the results on R2.
Lab Setup
If you’re using netlab, you’ll start with a preconfigured lab – netlab will configure IP addressing, OSPF routing, and EBGP sessions. If you’re using any other lab environment, you’ll have to configure all of that manually. The following tables describe the OSPF and BGP setup; the Reference Information section contains IP addressing information.
BGP Routers and AS Numbers
| Node/ASN | Router ID | Advertised prefixes |
|---|---|---|
| AS65000 | ||
| ce1 | 10.0.0.1 | |
| AS65001 | ||
| ce2 | 10.0.0.2 | |
| AS65100 | ||
| x1 | 10.0.0.10 |
BGP Neighbors
| Node | Router ID / Neighbor |
Router AS/ Neighbor AS |
Neighbor IPv4 |
|---|---|---|---|
| ce1 | 10.0.0.1 | 65000 | |
| x1 | 65100 | 10.1.0.2 | |
| ce2 | 10.0.0.2 | 65001 | |
| x1 | 65100 | 10.1.0.10 | |
| x1 | 10.0.0.10 | 65100 | |
| ce1 | 65000 | 10.1.0.1 | |
| ce2 | 65001 | 10.1.0.9 |
OSPF Setup (Area 0.0.0.0)
| Router | Interface | IPv4 Address | Neighbor(s) |
|---|---|---|---|
| ce1 | Loopback | 10.0.0.1/32 | |
| Ethernet2 | 10.1.0.5/30 | sw | |
| sw | Loopback | 10.42.42.1/32 | |
| eth1 | 10.1.0.6/30 | ce1 | |
| eth3 | 10.42.42.129/25 | passive |
Device Requirements
- Use any device supported by the netlab BGP and OSPF configuration modules.
- You can do automated lab validation with Arista EOS or FRRouting running on X1.
Start the Lab
You can start the lab on your own lab infrastructure or in GitHub Codespaces (more details):
- Change directory to
basic/8-aggregate - Execute netlab up
- Log into your devices with netlab connect and verify IP addresses, OSPF routing, and basic BGP configuration.
Note
netlab will configure IP addressing, OSPF routing, and EBGP sessions on your routers. If you’re not using netlab, you must manually configure them.
Redistribute OSPF into BGP
BGP will summarize (aggregate) only prefixes already in the BGP table. Your BGP tables are currently empty (you have not configured any prefixes to advertise). Redistribute OSPF into BGP on R1 to populate the BGP table with the prefixes from the 10.42.42.0/24 address space as you did in the Redistribute IGP Information Into BGP lab exercise.
Note
When you configure OSPF-to-BGP redistribution, some network devices redistribute only routes received from other OSPF routers, while other devices also redistribute local subnets on which you’re running OSPF. This implementation difference will not impact our lab exercise but might result in slightly different printouts.
After configuring the OSPF-to-BGP redistribution on R1 (running Arista cEOS), the BGP table on R1 contains numerous prefixes learned via OSPF1:
ce1#show ip bgp|begin Network
          Network                Next Hop              Metric  AIGP       LocPref Weight  Path
 * >      10.0.0.3/32            10.1.0.6              -       -          -       0       i
 * >      10.42.42.16/28         10.1.0.6              -       -          -       0       i
 * >      10.42.42.128/25        10.1.0.6              -       -          -       0       i
R1 advertises all these prefixes to X1, which propagates them to R2. The BGP table on R2 (and the global Internet) thus contains internal prefixes from Site-1 (a bad idea, but we’ll fix it).
ce2>show ip bgp|begin Network
          Network                Next Hop              Metric  AIGP       LocPref Weight  Path
 * >      10.0.0.3/32            10.1.0.10             0       -          100     0       65100 65000 i
 * >      10.42.42.16/28         10.1.0.10             0       -          100     0       65100 65000 i
 * >      10.42.42.128/25        10.1.0.10             0       -          100     0       65100 65000 i
Configure BGP Route Aggregation
This step is the crux of this lab exercise: using a BGP configuration command similar to aggregate-address, create a summary prefix 10.42.42.0/24 that will be advertised if at least one more specific prefix is in the BGP table.
The aggregate BGP prefix should appear in the BGP table on R1:
ce1#show ip bgp|begin Network
          Network                Next Hop              Metric  AIGP       LocPref Weight  Path
 * >      10.0.0.3/32            10.1.0.6              -       -          -       0       i
 * >      10.42.42.0/24          -                     0       -          -       0       i
 * >      10.42.42.16/28         10.1.0.6              -       -          -       0       i
 * >      10.42.42.128/25        10.1.0.6              -       -          -       0       i
The aggregated prefix is propagated to X1 and R2 (the good part), but R1 still advertises more specific prefixes (the bad part) and a loopback prefix (the ugly part).
ce2>show ip bgp|begin Network
          Network                Next Hop              Metric  AIGP       LocPref Weight  Path
 * >      10.0.0.3/32            10.1.0.10             0       -          100     0       65100 65000 i
 * >      10.42.42.0/24          10.1.0.10             0       -          100     0       65100 65000 i
 * >      10.42.42.16/28         10.1.0.10             0       -          100     0       65100 65000 i
 * >      10.42.42.128/25        10.1.0.10             0       -          100     0       65100 65000 i
Suppress More Specific Prefixes
Most BGP implementations can suppress more specific prefixes within an aggregate prefix. This functionality is often configured with the summary-only option of the aggregate-address BGP configuration command.
To fix the bad part of your current implementation, suppress more specific prefixes of the prefix 10.42.42.0/24 on R1.
After configuring the prefix suppression, examine the BGP table on R1. The more specific prefixes should be marked with s (suppressed):
ce1#show ip bgp|begin Network
          Network                Next Hop              Metric  AIGP       LocPref Weight  Path
 * >      10.0.0.3/32            10.1.0.6              -       -          -       0       i
 * >      10.42.42.0/24          -                     0       -          -       0       i
 *s>      10.42.42.16/28         10.1.0.6              -       -          -       0       i
 *s>      10.42.42.128/25        10.1.0.6              -       -          -       0       i
The suppressed prefixes should not be visible on R2 (unless you’re dealing with a nasty BGP bug):
ce2>show ip bgp|begin Network
          Network                Next Hop              Metric  AIGP       LocPref Weight  Path
 * >      10.0.0.3/32            10.1.0.10             0       -          100     0       65100 65000 i
 * >      10.42.42.0/24          10.1.0.10             0       -          100     0       65100 65000 i
Filter Outbound Updates
Finally, let’s fix the ugly part – deploy an outbound filter on the R1-X1 EBGP session that accepts only the prefixes you want to advertise (10.42.42.0/24)2. For more details, see the Filter Advertised Prefixes lab exercise.
With the outbound filter in place, the BGP table on R2 should contain only the desired IP prefix assigned to Site-1. Mission Accomplished!
ce2>show ip bgp|begin Network
          Network                Next Hop              Metric  AIGP       LocPref Weight  Path
 * >      10.42.42.0/24          10.1.0.10             0       -          100     0       65100 65000 i
Final Verification
- Disable the R1-SW link.
- Verify that the OSPF routes advertised by SW disappear from the BGP table on R1
- Verify that R1 advertises no BGP prefixes to X1/R2.
Next: Limit the Number of Accepted BGP Prefixes
Automated Verification
You can use the netlab validate command if you use FRRouting or Arista EOS on CE1. The validation tests check:
- The state of CE1-X1 EBGP session
- Whether CE1 advertises the summary prefix and suppresses the more specific prefixes
- Whether CE1 filters the loopback prefixes from the outgoing EBGP updates.
This is the printout you could get after configuring route aggregation but before configuring an outbound prefix filter:

Reference Information
This lab uses the 4-router lab topology. The following information might help you if you plan to build custom lab infrastructure:
Lab Wiring
| Origin Device | Origin Port | Destination Device | Destination Port |
|---|---|---|---|
| ce1 | Ethernet1 | x1 | eth1 |
| ce1 | Ethernet2 | sw | eth1 |
| ce2 | Ethernet1 | x1 | eth3 |
Lab Addressing
| Node/Interface | IPv4 Address | IPv6 Address | Description |
|---|---|---|---|
| ce1 | 10.0.0.1/32 | Loopback | |
| Ethernet1 | 10.1.0.1/30 | ce1 -> x1 | |
| Ethernet2 | 10.1.0.5/30 | ce1 -> sw | |
| ce2 | 10.0.0.2/32 | Loopback | |
| Ethernet1 | 10.1.0.9/30 | ce2 -> x1 | |
| sw | 10.0.0.3/32 | Loopback | |
| eth1 | 10.1.0.6/30 | sw -> ce1 | |
| lo1 | 10.42.42.129/25 | Loopback | |
| lo2 | 10.42.42.17/28 | Loopback | |
| x1 | 10.0.0.10/32 | Loopback | |
| eth1 | 10.1.0.2/30 | x1 -> ce1 | |
| eth3 | 10.1.0.10/30 | x1 -> ce2 |
-
I’m using the
|begin Networkfilter on the show ip bgp command to skip the printout legend. ↩ -
You should be a good Internet citizen and always do that anyway – you wouldn’t want to make headline news when your upstream providers fail to do their job. ↩